標籤彙整: xcode

Xcode 5.1 不編譯 64bit 的方法

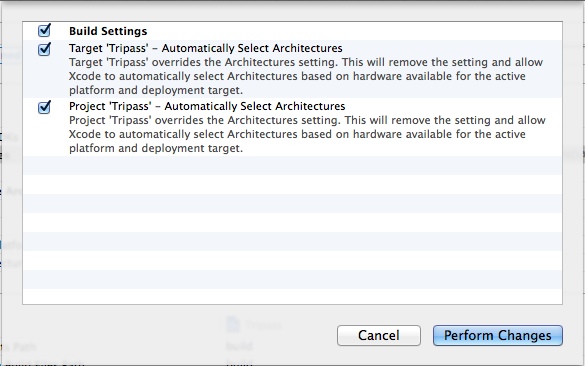
Xcode 升級到 5.1 後, Architectures 預設都會包含 arm64 ,若你之前是設定 armv7 armv7s ,竟然會變成 $(ARCHS_STANDARD_INCLUDING_64_BIT) ,預設值則變成 Standard architectures(armv7,armv7s,arm64) ,這兩個不管怎麼選都會包含 arm64。未選預設值編譯時也會出現建議你 Automatically Select Architectures 的黃色驚嘆號提示。


64biterror2

但是我使用的一些第三方 SDK 不支援 64bit ,例如 AdMob 與百度地圖,編譯時會出現以下錯誤訊息:
missing required architecture x86_64 in file
Undefined symbols for architecture x86_64

解決方法是 Architectures 選擇 Other... 刪除 $(ARCHS_STANDARD) 並輸入 armv7 armv7s ,這樣編譯時就不會包含 64bit 了。這只是暫時的解決方法,還是等第三方 SDK 出新版比較實在。

隱藏 navigation bar 的陰影底線

從 iOS 6 開始, navigation bar 最下方都有一條陰影。

在 iOS 6 上我都是使用偷吃步來處理,用 320*45px 的圖片蓋住1px的陰影。

[self.navigationController.navigationBar setBackgroundImage:[UIImage imageNamed:@"header.png"] forBarMetrics:UIBarMetricsDefault];


到了 iOS 7 上發現陰影永遠都在最上層,我把圖片改成 320*64px ( 多出的 20px 是 status bar),第一行方法名稱也換了。

[self.navigationController.navigationBar setBackgroundImage:[UIImage imageNamed:@"headerIos7.png"] forBarPosition:UIBarPositionAny barMetrics:UIBarMetricsDefault];
[self.navigationController.navigationBar setShadowImage:[UIImage new]];


這方法不適用於 setBackgroundColor ,因為 setShadowImage 似乎要與 setBackgroundImage 一起使用。

The app references non-public selectors in Payload ... id

此文章已經過期 SDK v4.0.1 之後變不再有此問題

這是一個在編譯時都沒甚麼徵兆,在上傳到 iTunes Connect 檢查才會冒出的警告。
雖然只是警告而非錯誤,怕審核不通過,所以還是處理一下。(好像也有人選擇註記在審核的欄位裡)

The app references non-public selectors in Payload/{Appname}.app/{App name]}: id

花了許多時間才發現是 Facebook SDK 惹的禍,原因是裡面的 property 名稱使用了保留字 id 造成的。
這問題好像存在很久了,只是 Facebook 一直沒去修正。
例如 FBGraphUser.h 這檔案打開來看...


@protocol FBGraphUser<FBGraphObject>
...
@property (retain, nonatomic) NSString *id;
...
@end


這樣的檔案不只一個,最簡單的修改方法就是用 [user objectForKey:@"id"] 或 user[@"id"] 來取代原來的 user.id。


/*
 * Callback for session changes.
 */
- (void)sessionStateChanged:(FBSession *)session
                      state:(FBSessionState) state
                      error:(NSError *)error
{
    switch (state) {
        case FBSessionStateOpen:
            if (!error) {
                // We have a valid session
                //NSLog(@"User session found");
                [FBRequestConnection
                 startForMeWithCompletionHandler:^(FBRequestConnection *connection,
                                                   NSDictionary<FBGraphUser> *user,
                                                   NSError *error) {
                     if (!error) {
                         self.loggedInUserID = [user objectForKey:@"id"];
                         self.loggedInSession = FBSession.activeSession;
                     }
                 }];
            }
            break;
        case FBSessionStateClosed:
        case FBSessionStateClosedLoginFailed:
            [FBSession.activeSession closeAndClearTokenInformation];
            break;
        default:
            break;
    }

    [[NSNotificationCenter defaultCenter]
     postNotificationName:FBSessionStateChangedNotification
     object:session];

    if (error) {
        UIAlertView *alertView = [[UIAlertView alloc]
                                  initWithTitle:@"Error"
                                  message:error.localizedDescription
                                  delegate:nil
                                  cancelButtonTitle:@"OK"
                                  otherButtonTitles:nil];
        [alertView show];
    }
}


這類錯誤警告只要用最後的關鍵字搜尋整個專案大概可以找到要改的地方,只不過以 id 這種前後都可以組很多單字就只能用猜的...

從 App 裡跳到 App Store 並指定 App 的方法

在 iOS 6 或更早的版本我們可以藉由以下兩句跳到指定 App 的介紹頁面或是評價頁面。

// 跳到介紹頁
NSString *str = @"itms-apps://ax.itunes.apple.com/WebObjects/MZStore.woa/wa/viewSoftware?id=546652347";

// 跳到評價頁
// NSString *str = @"itms-apps://ax.itunes.apple.com/WebObjects/MZStore.woa/wa/viewContentsUserReviews?type=Purple+Software&id=546652347";

[[UIApplication sharedApplication] openURL: [NSURL URLWithString:str]];


但在 iOS 7 這樣寫只會跳到空白的頁面,語法要改成這樣:

// 跳到介紹頁
NSString *str = @"itms-apps://itunes.apple.com/app/id546652347";

// 跳到評價頁
// NSString *str = @"https://itunes.apple.com/WebObjects/MZStore.woa/wa/viewContentsUserReviews?id=546652347&pageNumber=0&sortOrdering=2&type=Purple+Software&mt=8";

[[UIApplication sharedApplication] openURL: [NSURL URLWithString:str]];

並且不能直接跳到評價那個頁面了,這語法支援 iOS 5.1+,所以之後都用這種語法吧!

讓 Xcode 5 支援 iOS 6 或更舊的 SDK

首先要取得低版本的 iOS SDK ,如果手邊有舊版 Xcode 4.x 就去底下的位址複製再貼到 Xcode 5 裡。

/Applications/Xcode.app/Contents/Developer/Platforms/iPhoneOS.platform/Developer/SDKs

該目下會有各版本的 SDK ,例如 iPhoneOS6.1.sdk 。

若手邊沒有也可以去 iOS Dev Center 下載舊版的 Xcode 。
下載後不用安裝,只需掛載拿取裡面的 iPhoneOS6.1.sdk ,位址跟上面的一樣。

接下來就是設定 Xcode 的部份了,Build Settings → Architectures → Base SDK 改成 iOS 6.1 。
這樣在 iOS 7 上跑也都是看到舊版的 UI ,但這也代表無法使用 iOS 7 帶來的新功能。

Line API 傳送文字及圖片 for iOS

Line API 我不想看韓文及日文,終於讓我找到英文版的。
我測試之後發現它無法同時傳送文字及圖片,只能一次傳一種格式。


傳送文字時,若是網址會變成超連結。

    NSString *plainString = @"Hello, World! 中文測試~";

    NSString *contentKey = (__bridge NSString *)CFURLCreateStringByAddingPercentEscapes(NULL,
                                                                                        (CFStringRef)plainString,
                                                                                        NULL,
                                                                                        (CFStringRef)@"!*'();:@&=+$,/?%#[]",
                                                                                        kCFStringEncodingUTF8);
    NSString *contentType = @"text";

    NSString *urlString = [NSString stringWithFormat:@"line://msg/%@/%@",
         contentType, contentKey];

    [[UIApplication sharedApplication] openURL:[NSURL URLWithString:urlString]];


傳送圖片的圖片來源可以是網路、專案或是手機內的,只要是 UIImage 都行。

    UIPasteboard *pasteboard = [UIPasteboard pasteboardWithUniqueName];
    NSString *pasteboardName = pasteboard.name;
    NSURL *imageURL = [NSURL URLWithString:@"https://www.google.com.tw/images/srpr/logo4w.png"];
    [pasteboard setData:UIImagePNGRepresentation([UIImage imageWithData:[NSData dataWithContentsOfURL:imageURL]]) forPasteboardType:@"public.png"];

    NSString *contentType = @"image";
    NSString *contentKey = (__bridge_transfer NSString*)CFURLCreateStringByAddingPercentEscapes(NULL,
                                                                                             (CFStringRef)pasteboardName,
                                                                                             NULL,
                                                                                             CFSTR(":/?=,!$&'()*+;[]@#"),
                                                                                             CFStringConvertNSStringEncodingToEncoding(NSUTF8StringEncoding));

    NSString *urlString = [NSString stringWithFormat:@"line://msg/%@/%@",
                           contentType, contentKey];
    [[UIApplication sharedApplication] openURL:[NSURL URLWithString:urlString]];


加上檢查有沒有安裝 Line 再執行以上動作會更好。

    if ([[UIApplication sharedApplication] canOpenURL:[NSURL URLWithString:@"line://"]]) {
        // do something
    }

使用 Xcode 中的 Refactor 更改 Class 名稱

不知道有沒有這種經驗呢?
創建 Class 當時沒有認真想名稱,或是第一個字母忘記用大寫(某種強迫症),但是檔案又修改到一定程度了。
這時如果手動改會死人,檔案名稱就不講了,檔案內容裡也有眾多項目要改,用尋找與取代還是很慢而且容易出錯。
好在 Xcode 裡有 Refactor 這功能方便許多。

建議做之前請先備份整個專案。

例如我要將 introductionVC 改成 IntroductionVC (.h .m .xib共三個檔案)

打開 introductionVC.h 選取 @interface introductionVC : UIViewController 的 introductionVC 部分
Edit → Refactor → Rename → 輸入名稱 → Preview → 會有預覽畫面確認 → Save → 問你要不要做 snapshot → Enable

請注意:若修改前後只是差在大小寫,檔案名稱會無法修改,所以我執行同樣動作兩次才能達到目的。

使用 Application Loader 上傳至 iTunes Connect

不知從什麼時候開始,我用 Xcode 上傳放了一整天一直無回應(進度條一直沒變化),只好使用 Application Loader 上傳。

Xcode → Product → Archive → 跑完之後會自動開啟 Organizer 的 Archives 分頁。

這時滑鼠右鍵該項目 → Show in Finder → 對 .xcarchive 這個檔案 → 顯示套件內容 → 把在 Products/Applications/ 目錄下的 xxx.app 壓縮 → 把壓縮檔移至桌面(方便上傳而已)

呼叫 Spotlight(上方工具列的放大鏡) → 搜尋 Application Loader 並執行。
接下來的步驟就不用我說了吧! 上傳時間大約等個30分鐘再回來看看~