標籤彙整: linux

安裝 Windows Subsystem for Linux 2 (WSL 2)

WSL 2

Windows Subsystem for Linux 2 (WSL 2) 是指在 Windows 下的 Linux 子系統,與傳統的虛擬機不同,效能更好且可與 Windows 的指令互動,檔案也可輕鬆存取,你甚至可以在 Windows 10 使用 Visual Studio Code 編輯 Linux 的程式碼檔案,然後用 Linux 來執行程式碼。

環境需求

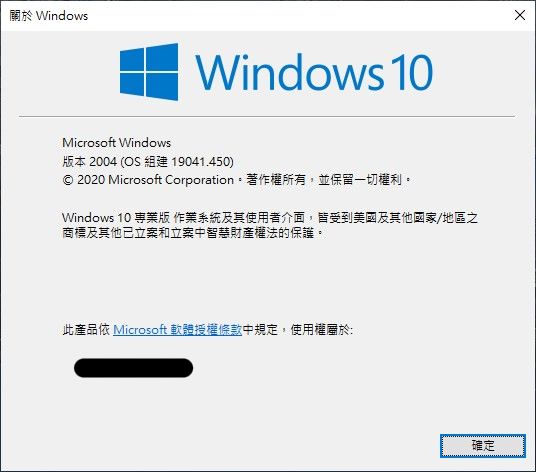
Windows 10 版本必須是 2004 (19041.450) 以上
版本資訊可以從下方的工具列搜尋欄輸入 winver 再按 Enter 鍵打開
Windows 10 版本需求

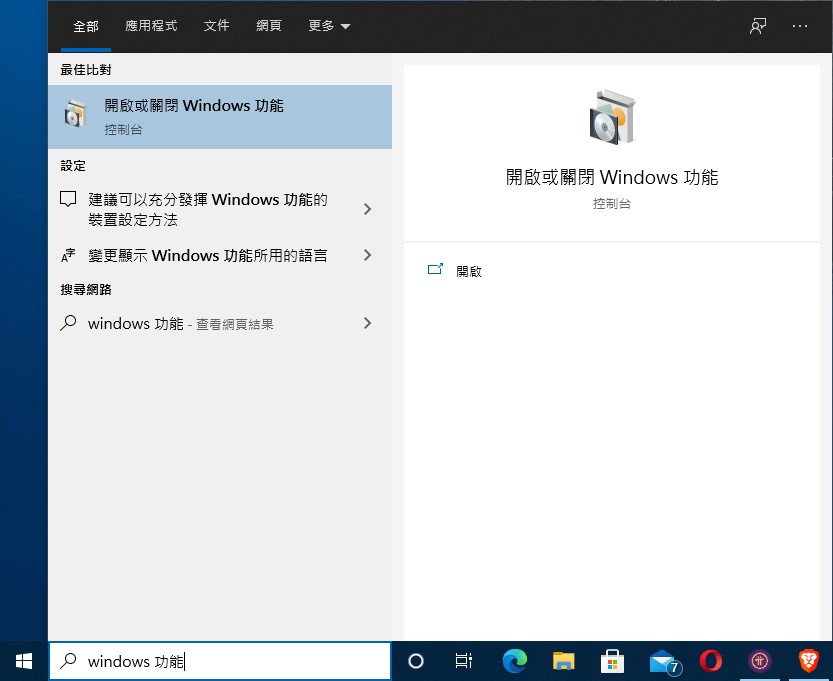
安裝 Windows 功能

新增 Windows 功能
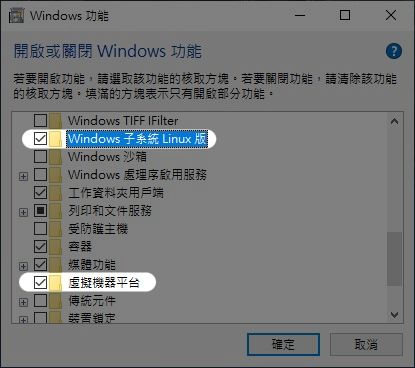
新增 Windows 功能

打勾圖中的這兩項再按確定,它會提示你需要重開機才會安裝

或是你可以在 Windows PowerShell 執行以下指令來安裝(兩種安裝方式擇一)

Enable-WindowsOptionalFeature -Online -FeatureName $("VirtualMachinePlatform", "Microsoft-Windows-Subsystem-Linux")

更新 WSL

內建的 WSL 可能是舊版本,這時還需要從以下網址安裝更新檔

https://docs.microsoft.com/zh-tw/windows/wsl/wsl2-kernel

安裝完請重開機。

安裝 Linux 發行版

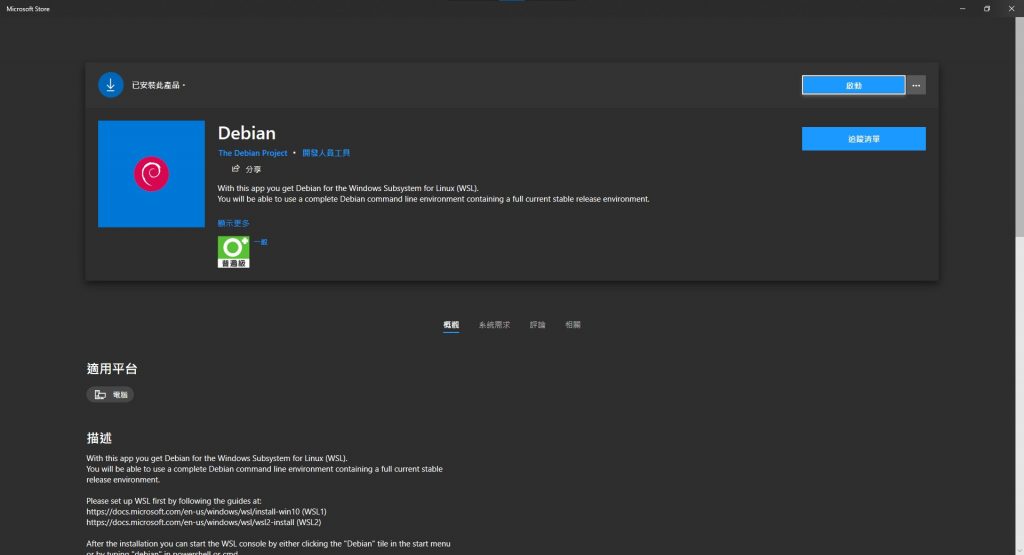
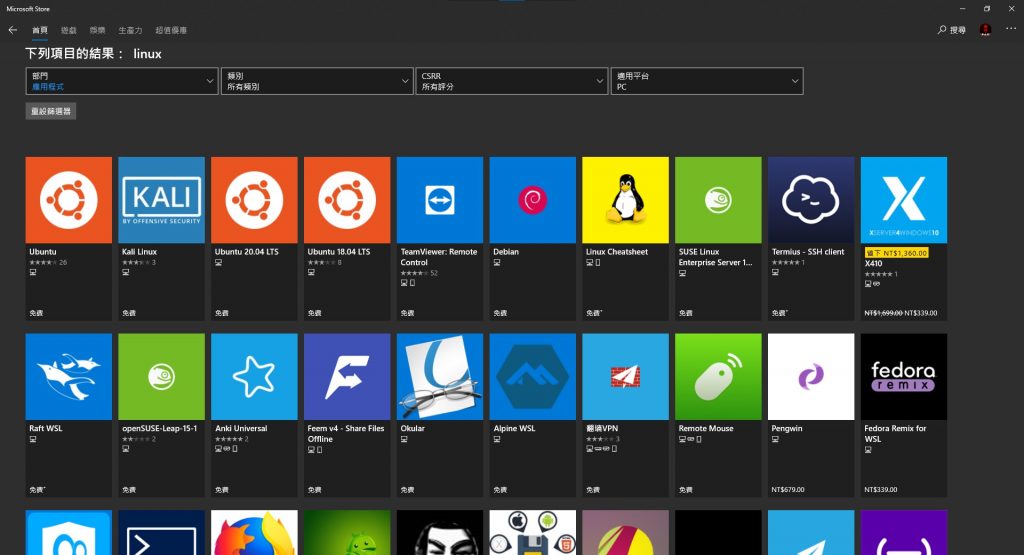
從微軟市集下載安裝 Linux 發行版,我這邊以 Debian 為例(個人架站喜好),你也可以選擇其他的發行版本來安裝。
安裝 Linux
安裝 Linux

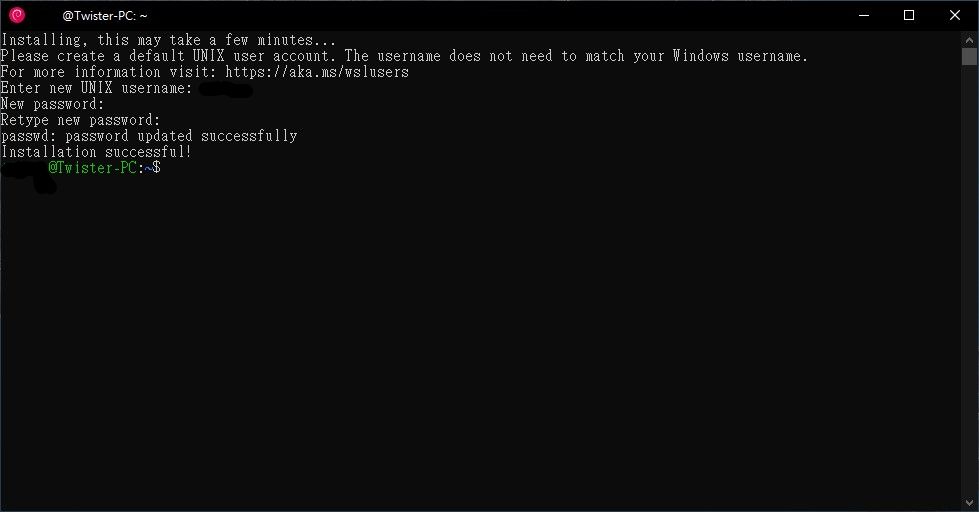
啟動 Linux 之後要做初始設定,請輸入 Linux 新使用者的帳號密碼(可與 Windows 不同)
Linux 初始設定

至此 Linux 已經安裝完成,但要注意的是這個視窗若是關閉就等於 Linux 也整個停止運作了。

在 Windows PowerShell 檢查 WSL 的運作

打開 Windows PowerShell 輸入以下指令

wsl -l -v

PowerShell

STATE 就是狀態,會顯示運行中或是已停止
VERSION 就是 WSL 的版本,可以自由切換回 WSL 1 或是 WSL 2

若是想把某個 Linux 從 WSL 1 切換到 WSL 2 就要輸入

wsl --set-version Debian 2

若是想把預設從 WSL 1 切換到 WSL 2 就要輸入

wsl --set-default-version 2

Docker Desktop 改用 WSL 2

早期 Docker Desktop 是以 Hyper-V 來運作的,所以有些家用版的人無法使用到,現在 WSL 2 出來了,效能也更好了推薦大家改用 WSL 2 。
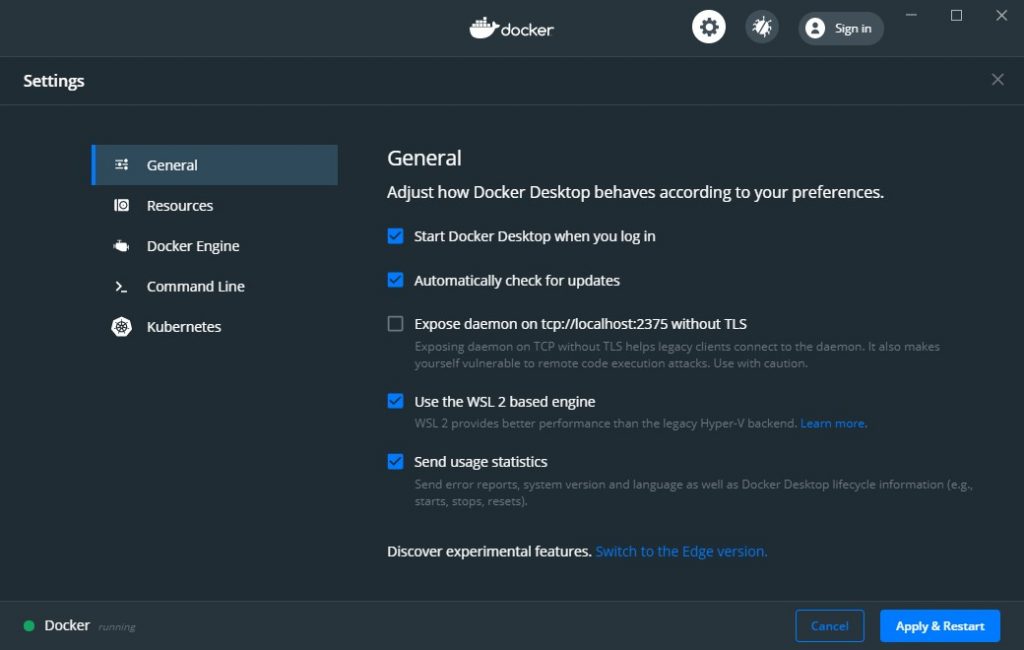
Docker Desktop 設定
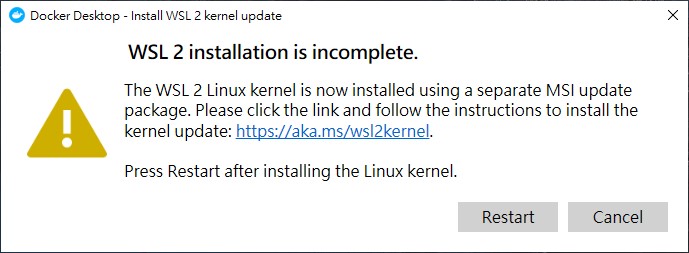
Docker Desktop 提示更新至 WSL 2

若是出現這個訊息代表你的 WSL 沒有安裝更新,請點選那個連結進行更新。

存取 Linux 中的檔案

開啟檔案總管並在網址列打上

\\wsl$

就可找到所有正在執行中的 Linux 目錄

使用 Let’s Encrypt 及 Certbot 在 Debian 上的 Nginx 啟用 HTTPS

本篇文章所搭配環境為 Debian 9 + Nginx 並使用架構在 Let’s Encrypt 上的 Certbot 來啟用 HTTPS 。


找出各網域所對應的根目錄

先去 /etc/nginx/sites-enabled/default 這個檔案記錄下各子網域所對應的根目錄
例如我的像是這樣
dreambreakerx.com /usr/share/nginx/www
api.dreambreakerx.com /usr/share/nginx/api
blog.dreambreakerx.com /usr/share/nginx/blog


安裝 Certbot

apt-get install python-certbot-nginx -t stretch-backports

如果無錯誤請直接跳到設定 Certbot 那個步驟,若是出現
E: The value 'stretch-backports' is invalid for APT::Default-Release as such a release is not available in the sources
請按照 https://backports.debian.org/Instructions/
編輯 /etc/apt/sources.list 這個檔案新增這行
deb http://ftp.debian.org/debian stretch-backports main

pico /etc/apt/sources.list
apt-get update
apt-get install python-certbot-nginx -t stretch-backports


設定 Certbot

certbot --authenticator webroot --installer nginx

各項設定請參考下面,需要注意的是我輸入一個空格字元選擇所有的網域,以及最後我設定強制使用 https

Enter email address (used for urgent renewal and security notices) (Enter 'c' to
cancel): example@gmail.com

-------------------------------------------------------------------------------
Please read the Terms of Service at
https://letsencrypt.org/documents/LE-SA-v1.2-November-15-2017.pdf. You must
agree in order to register with the ACME server at
https://acme-v01.api.letsencrypt.org/directory
-------------------------------------------------------------------------------
(A)gree/(C)ancel: A

-------------------------------------------------------------------------------
Would you be willing to share your email address with the Electronic Frontier
Foundation, a founding partner of the Let's Encrypt project and the non-profit
organization that develops Certbot? We'd like to send you email about EFF and
our work to encrypt the web, protect its users and defend digital rights.
-------------------------------------------------------------------------------
(Y)es/(N)o: Y

Which names would you like to activate HTTPS for?
-------------------------------------------------------------------------------
1: dreambreakerx.com
2: api.dreambreakerx.com
3: blog.dreambreakerx.com
-------------------------------------------------------------------------------
Select the appropriate numbers separated by commas and/or spaces, or leave input
blank to select all options shown (Enter 'c' to cancel):

Input the webroot for dreambreakerx.com: (Enter 'c' to cancel): /usr/share/nginx/www

Select the webroot for api.dreambreakerx.com:
-------------------------------------------------------------------------------
1: Enter a new webroot
2: /usr/share/nginx/www
-------------------------------------------------------------------------------
Select the appropriate number [1-2] then [enter] (press 'c' to cancel): 1
Input the webroot for api.dreambreakerx.com: (Enter 'c' to cancel): /usr/share/nginx/api

Select the webroot for blog.dreambreakerx.com:
-------------------------------------------------------------------------------
1: Enter a new webroot
2: /usr/share/nginx/api
3: /usr/share/nginx/www
-------------------------------------------------------------------------------
Select the appropriate number [1-3] then [enter] (press 'c' to cancel): 1
Input the webroot for blog.dreambreakerx.com: (Enter 'c' to cancel): /usr/share/nginx/blog

Please choose whether or not to redirect HTTP traffic to HTTPS, removing HTTP access.
-------------------------------------------------------------------------------
1: No redirect - Make no further changes to the webserver configuration.
2: Redirect - Make all requests redirect to secure HTTPS access. Choose this for
new sites, or if you're confident your site works on HTTPS. You can undo this
change by editing your web server's configuration.
-------------------------------------------------------------------------------
Select the appropriate number [1-2] then [enter] (press 'c' to cancel): 2

接著可以試試新網址,也試試舊網址有沒有轉址到 https


自動更新證書

更新時使用這句

certbot renew --dry-run

也可以加入 Cron Job ,讓它每個星期一早上3點30分自動執行

crontab -e
30 3 * * 1 certbot renew --dry-run


Raspbian 從 7 Wheezy 升級到 8 Jessie

Raspbian 與 Ubuntu 一樣都是基於 Debian 改來的
如今 Debian 的最新版已經到 8 (Jessie) 囉
如果想要全新安裝只要下載燒錄到記憶卡即可
要保留資料就要用升級的方式

此篇文章只是簡單翻譯官方論壇的這篇文章,不會每一行都詳細解釋,請搭配服用
怕搞砸了話更新前先備份吧


更新系統以及軟體包

  1. 修改檔案 /etc/apt/sources.list 把第一行所有的 "wheezy" 置換為 "jessie" ,修改後大概是這樣 “deb http://mirrordirector.raspbian.org/raspbian/ jessie main contrib non-free rpi”
  2. 修改檔案 /etc/apt/sources.list.d/raspi.list 把第一行所有的 "wheezy" 置換為 "jessie",第一行最後加上 “ ui” ,修改後大概是這樣 “deb http://archive.raspberrypi.org/debian jessie main ui”
  3. 建立資料夾 /home/pi/.config/autostart , “mkdir /home/pi/.config/autostart” (注意 config 前面有 "." )
  4. 更新軟體套件庫 “sudo apt-get update”
  5. 升級系統及軟體 “sudo apt-get -y dist-upgrade” (這過程大概兩小時, "-y" 是不詢問直接安裝)


初次啟動 Jessie

第一次啟動需要一些時間,請耐心等待 command line 停止然後再登入 pi 使用者
如果沒有自動啟動圖形化介面,輸入 “startx” ,等到桌面整個載入完成。


安裝新的軟體包

桌面完成後來安裝一些軟體 “sudo apt-get install rc-gui libreoffice libreoffice-gtk alacarte bluej greenfoot claws-mail”


圖形介面修正

“cp –ax /usr/share/themes/PiX ~/.themes” – 載入新版本的 PiX 主題 (注意 themes 前面有 "." ,而且我用 PieTTY 複製會掉字)
“sudo rm /etc/xdg/autostart/clipit-startup.desktop” – 防止 ClipIt 應用程式開機就自動執行
“sudo rm /etc/xdg/autostart/wicd-tray.desktop” – 防止 Wicd 應用程式開機就自動執行
“sudo rm –rf /var/lib/menu-xdg” – 移除選單上"其他"的一大堆應用程式捷徑
“sudo raspi-config nonint do_boot_behaviour_new B4” – 自動登入 pi  使用者
“sudo rm /usr/share/applications/obconf.desktop” – 刪除已被取代的無用捷徑 (注意 applications 有加 "s")


精簡的主選單

安裝 Jessie 後選單會多出一些新的軟體,但不保證所有都可以打開,你可以透過 Preferences  下的 Main Menu Editor 來隱藏它,總共多了以下的捷徑

Internet/Deluge BitTorrent Client
Internet/Pi Store
Internet/Wicd Network Manager
Accessories/Character Map
Accessories/ClipIt
Accessories/Disks
Sound & Video/Alsamixergui
Sound & Video/Audio Mixer
Sound & Video/GNOME MPlayer
System Tools/Disk Management
Preferences/About Myself
Preferences/Network
Preferences/Password
Preferences/Services
Preferences/Time and Date
Preferences/Users and Groups


Raspberry Pi 2 透過 USB 無線網卡連上 WiFi

Raspberry Pi 2 Model B
任意Linux (Raspbian)
任意USB網卡 (Edimax EW-7811Un)


插好網卡後打上

lsusb

應該會看到 Edimax EW-7811Un 出現在裡面


lsmod

接著會看到 8192cu 模組被載入


iwconfig

出現一個 wlan0,請記住這個名稱


sudo pico /etc/network/interfaces

如果沒有 wlan0 請複製以下到最底部並存檔離開

auto wlan0
allow-hotplug wlan0
iface wlan0 inet manual
wpa-conf /etc/wpa_supplicant/wpa_supplicant.conf


掃描附近的 AP

iwlist wlan0 scanning

記住 SSID


sudo pico /etc/wpa_supplicant/wpa_supplicant.conf

底部新增無線網路設定,格式如下,可同時有多個設定並擁有不同優先權

network={
ssid="Twister 2.4GHz"
proto=RSN
key_mgmt=WPA-PSK
pairwise=CCMP TKIP
psk="12345678"
priority=2
}

network={
ssid="Twister Lumia 920"
proto=RSN
key_mgmt=WPA-PSK
pairwise=CCMP TKIP
psk="12345678"
}

主要是設定 ssid 與 psk 兩項
priority 預設值為0,數值越大優先使用
存檔後離開


/etc/init.d/networking restart

重啟網路設定


ifconfig wlan0

如果設定正確了話就會取得 IP
當然,以上步驟都可以藉由圖形化介面來設定~


安裝 APC (Alternative PHP Cache)

apt-get install php-pear php5-dev libpcre3-dev make
pear upgrade
pecl install apc

apc安裝時會問一些問題,我都按照它預設的回答。


vi /etc/php5/conf.d/apc.ini

新增 apc.ini

[apc]
extension=apc.so
; enable APC
apc.enabled=1
; The number of shared memory segments
apc.shm_segments=1
; The size of each shared memory segment
apc.shm_size=64M
; The number of seconds a cache entry is allowed to idle in a slot in case this
; cache entry slot is needed by another entry.
apc.ttl=7200


重新啟動載入新設定

service php5-fpm restart


寫個php來看看APC有沒有安裝成功

<?php
	phpinfo();
?>

有出現apc就代表成功了,詳細設定還沒研究。