標籤彙整: ios

使用 iOS 11 中的相機與 Safari 來辨識 QR Code

現在 iOS 11 終於內建 QR Code 辨識,主要是透過相機與 Safari 來支援此功能。
Android 則要用 ZXing Team 的 條碼掃描器 來掃 (部分手機商則是整合在相機中)。
兩邊通用幾乎就是直接照抄 ZXing Project 一樣
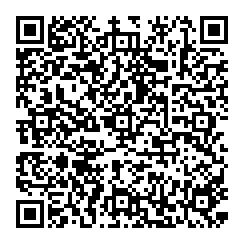
以下是針對 QR Code 的原始內容,只要格式正確就能觸發各種不同功能。


相機

URL QR Code

https://www.apple.com
URL QR Code


Location QR Code

geo:37.33182,-122.03118
Location QR Code 1

http://maps.apple.com/?address=1,Infinite+Loop,Cupertino,California
Location QR Code 2


Message QR Code

sms:1-408-555-1212
Message QR Code 1

SMSTO:1-408-555-1212:Hello World
Message QR Code 2


Email QR Code

mailto:john.appleseed@apple.com
Email QR Code


Phone Number QR Code

tel:+1-408-555-5555
Phone Number QR Code


Contact QR Code
vCard format

BEGIN:VCARD
VERSION:3.0
N:Appleseed;John;;Mr.;
FN:John Appleseed
ORG:Apple Inc
TEL;TYPE=WORK,VOICE:(408) 555-1212
EMAIL:john.appleseed@apple.com
END:VCARD

Contact QR Code 1


Contact QR Code
MeCard format

MECARD:N:Appleseed,John;TEL:14085551212;EMAIL:john.appleseed@apple.com;;

Contact QR Code 2


Event QR Code
iCalendar format

BEGIN:VCALENDAR
BEGIN:VEVENT
SUMMARY:My event
LOCATION:My Office
DTSTART:20170125T090000
DTEND:20170125T100000
END:VEVENT
END:VCALENDAR

Event QR Code


WiFi QR Code

WIFI:T:WPA;S:mynetwork;P:mypasscode;;

WiFi QR Code


Safari

使用 Safari 在 QR Code 的圖片用 3D Touch 就能叫出選單,對於有些只有 QR Code 圖片卻沒有超連結的網頁很實用。
因為我部落格有裝 Lightbox ,所以進到 Lightbox 後再用 3D Touch 才有效。


資料來源
https://developer.apple.com/videos/play/tech-talks/206/
 

AR Quick Look 讓你在網站及 App 中展示 3D 模型及拍照

AR Quick Look 是 iOS 12 的新功能,可以在網站及 App 中展示 3D 模型,更可以在 AR 模式與之拍照。

以下分別是網站及 App 的程式碼,素材皆來自 AR Quick Look Gallery ,若想自行產生 usdz 格式的檔案請參考這篇文章


網站 (只有 iOS 12 Safari 實機才有效果)

<!DOCTYPE html>
<html>
    <head>
        <meta http-equiv="Content-Type" content="text/html; charset=utf-8">
        <title>AR Test</title>
    </head>
    <body>
        <h1>AR Quick Look in Websites</h1>
        <p>這是從 https://developer.apple.com/arkit/gallery/ 下載的模型,僅供測試用。</p>
        <p>需使用 iOS 12 的 Safari 觀看。</p>
        <a href="cupandsaucer.usdz" rel="ar">
            <img src="cupandsaucer.jpg" width=200>
        </a>
    </body>
</html>


App (只有 iOS 12 實機才有效果)

import UIKit
import QuickLook

class ViewController: UIViewController, QLPreviewControllerDataSource, QLPreviewControllerDelegate {

    override func viewDidLoad() {
        super.viewDidLoad()
        
    }
    
    func numberOfPreviewItems(in controller: QLPreviewController) -> Int {
        
        return 1
    }
    
    func previewController(_ controller: QLPreviewController, previewItemAt index: Int) -> QLPreviewItem {
        
        let url = Bundle.main.url(forResource: "cupandsaucer", withExtension: "usdz")!
        return url as QLPreviewItem
    }
    
    @IBAction func buttonPressed(_ sender: UIButton) {
        
        let previewController = QLPreviewController()
        previewController.dataSource = self
        previewController.delegate = self
        self.present(previewController, animated: true)
    }
}


參考資料
https://developer.apple.com/arkit/

實現 iOS App 與網站之間互通的 Universal Links

Universal Links 是網站與應用程式之間的橋樑,可以將使用者從網站導引至應用程式。比如說有個網址是 http://www.example.com/book/12345678 ,在 iOS 上用 Safari 瀏覽時剛好也有安裝 App 端,網頁最上方就會出現一個  "在「XXX」App 中打開" 的橫幅,點擊就會開啟 App 端進到指定的頁面。

你可能對於 URL Schemes 不陌生,以前要從網頁連到 App 需要判斷是否有安裝該 App,然後分別連到 App 下載頁面或是開啟 App 到某一頁。現在有了 Universal Links 確實方便許多,至少已安裝的部分系統已經幫你處理好了。


Apple Developer 設定

先去 iOS App IDs 確定該 ID 的 Associated Domains 為啟用狀態。


Xcode 專案設定

Target → Capabilities → 打開 Associated Domains → + → "applinks:example.com"


Web 設定

新增一個 apple-app-site-association 檔案(沒有副檔名),內容如下:

{
    "applinks": {
        "apps": [],
        "details": [
            {
                "appID": "D3KQX62K1A.com.example.DemoApp",
                "paths": [
                    "*"
                ]
            }
        ]
    }
}

若已有這個檔案,只要加入 applinks 這個層級並保持 JSON 結構即可。
D3KQX62K1A 為 Team ID ,可以從這裡找到。
com.example.DemoApp 為 Bundle Identifier 。
paths 裡寫 "*" 代表整個網站都會處理,初期為測試方便所以先全部接收,如果只想接收 /book 就寫 "/book"。另外除了 "*" 也能搭配使用 "?" 及 "NOT" 使用。

將此檔案放在網站的 .well-known 資料夾下,整個網址就像這樣 https://example.com/.well-known/apple-app-site-association ,需注意必須要 https:// 開頭,如果有子網域也要分別作設定。每當 App 安裝或是更新版本才會去抓 apple-app-site-association 。


程式碼設定

func application(_ application: UIApplication, continue userActivity: NSUserActivity, restorationHandler: @escaping ([Any]?) -> Void) -> Bool {
        
    // 來源是網頁或網址
    if userActivity.activityType == NSUserActivityTypeBrowsingWeb,
        let incomingURL = userActivity.webpageURL,
        let components = NSURLComponents(url: incomingURL, resolvingAgainstBaseURL: true),
        let path = components.path {
            
        print("path = \(path)")
            
        // 如果之前有做 URL Schemes 處理,可以搭配使用
        /*  書籍資訊
            https://www.example.com/book/12345678
            com.example.DemoApp://book/12345678
         */
        if path.hasPrefix("/book/"), let bookID = path.components(separatedBy: "/").last, bookID.count >= 10 {
            // 跳轉到書籍詳細資訊
            return true
        }
        return false
    }
        
    return false
}


 在 iOS 使用 Safari 瀏覽此網址,可以看到上方的橫幅。若沒有看到可以捲動一下頁面,它有時會隱藏。接著把網址放到備忘錄並對他長按放開,會多出一個 "在「XXX」中打開" 的選項。

 Apple 也有提供工具來檢驗,如果出現 Error no apps with domain entitlements 也不用太糾結,可能是有此功能的新版本未正式上線的關係,只要確定網頁上方有出現橫幅就是成功了。


參考資料
https://developer.apple.com/ios/universal-links/
https://developer.apple.com/documentation/uikit/core_app/allowing_apps_and_websites_to_link_to_your_content
https://developer.apple.com/documentation/uikit/core_app/allowing_apps_and_websites_to_link_to_your_content/enabling_universal_links
https://developer.apple.com/documentation/uikit/core_app/allowing_apps_and_websites_to_link_to_your_content/handling_universal_links

在 iOS App 裡實現密碼自動填寫

想像一下這個使用情境,某個服務有 Web 也有 App,若使用者有用 Safari 登入並記住密碼,那麼在 App 裡點擊 Text Field 的鍵盤會提示是否要用已儲存的密碼,點擊後帳號密碼就會填入對應的 Text Field 中,使用者完全不用自行輸入非常方便。

若要實現這功能需要從 App 以及 Web 兩邊都做設定,且系統需求為 iOS 11 以上。


Apple Developer 設定

先去 iOS App IDs 確定該 ID 的 Associated Domains 為啟用狀態。


Xcode 專案設定

Target → Capabilities → 打開 Associated Domains → + → "webcredentials:example.com"


Web 設定

新增一個 apple-app-site-association 檔案(沒有副檔名),內容如下:

{
    "webcredentials": {
        "apps": [
            "D3KQX62K1A.com.example.DemoApp",
            "D3KQX62K1A.com.example.DemoAdminApp"
        ]
    }
}

若已有這個檔案,只要加入 webcredentials 這個層級並保持 JSON 結構即可。
D3KQX62K1A 為 Team ID ,可以從這裡找到。
com.example.DemoApp 為 Bundle Identifier 。

將此檔案放在網站的 .well-known 資料夾下,整個網址就像這樣 https://example.com/.well-known/apple-app-site-association ,需注意必須要 https:// 開頭,如果有子網域也要分別作設定。每當 App 安裝或是更新版本才會去抓 apple-app-site-association 。


現在你可以試試先在網站登入並儲存密碼,儲存的密碼可在 設定 → 帳號與密碼 → App 與網站密碼 裡找到。

然後回到 App 的登入畫面裡點擊 Text Field 應該就可使用儲存的帳號密碼了,雖然這只是單向的。


你可能會發現並非所有的 Text Field 都會出現,因為預設是以 secureTextEntry 這屬性來判斷是否為密碼,若沒指定則需要另外要用 textContentType 來指定:

userTextField.textContentType = .username
userTextField.keyboardType = .emailAddress
passwordTextField.textContentType = .password

newPasswordTextField.textContentType = .newPassword
confirmPasswordTextField.textContentType = .newPassword

singleFactorCodeTextField.textContentType = .oneTimeCode


參考資料
https://developer.apple.com/documentation/security/password_autofill/
https://developer.apple.com/documentation/security/password_autofill/setting_up_an_app_s_associated_domains
https://developer.apple.com/documentation/security/password_autofill/enabling_password_autofill_on_a_text_input_view

使用 Network Link Conditioner 在 iOS 實機與模擬器模擬伺服器無回應逾時或網路極慢的狀況

在製作一個需要連網的 App 時,常常會需要打 API 取得資料,所以我們一定會針對伺服器回傳的資料處理,但要是伺服器根本就無回應呢?這時我們就需要使用 Network Link Conditioner 這項工具模擬出不同的網路環境做處理。


實機設定

先從 設定 → 開發者 → Network Link Conditioner 進去。
選擇 profile ,這裡因為要模擬 timedout 的情況所以選擇 100% Loss 。
並且 Enable 設定為開啟,這樣整台 iOS 裝置都會受到影響。

Network Link Conditioner iOS


模擬器設定

由於模擬器的設定裡沒有 Network Link Conditioner ,必須透過電腦設定才行。
請依照 Xcode 版本下載對應的檔案,不然會沒有效果。
Xcode 8 以上請從這下載安裝。
Xcode 7 以下請從這下載安裝。

掛載 dmg 尋找 Network Link Conditioner.prefPane 並點兩下安裝重開機。
路徑是 Additional Tools/Hardware/Network Link Conditioner.prefPane 。
安裝成功會在系統偏好設定裡出現 Network Link Conditioner。

Network Link Conditioner Mac 1

Network Link Conditioner Mac 2

使用方法跟實機一樣就不多說了,也可用用 Very Bad Network 這個 profile 模擬網路超慢的情況,這個會影響到整台電腦與模擬器請小心使用。


在 UITableViewCell 中取得 UITableView 或 UIViewController

在 iOS 7 ~ iOS 10 , UITableViewCell 與 UITableView 中間多了一層 UITableViewWrapperView ,直到 iOS 11 又移除...

將以下兩段複製到繼承 UITableViewCell 的自定義 class 裡

    weak var tableView: UITableView? {
        // 在 iOS 7 ~ 10 中 ,UITableViewCell 的 superview 為 UITableViewWrapperView 而不是 UITableView
        if #available(iOS 11, *) {
            return self.superview as? UITableView
        }else {
            return self.superview?.superview as? UITableView
        }
    }
    weak var viewController: UIViewController? {
        return self.tableView?.delegate as? UIViewController
    }

Developers are responsible for assigning appropriate ratings to their Apps

3.8 - Developers are responsible for assigning appropriate ratings to their Apps. Inappropriate ratings may be changed/deleted by Apple

3.8 Details

The rating you’ve selected, 12+, is inconsistent with the content of your app. Since your app includes contests or sweepstakes, you must select “Yes” for Gambling and Contests in iTunes Connect.

Next Steps

Please update your Rating selections in iTunes Connect.

- Log in to iTunes Connect
- Click on “My Apps”
- Select your app
- Scroll down to select a Rating on the App Details page
- Click the Edit button next to “Rating”
- Change the Rating selections
- Click “Save”
- Once you’ve completed all changes, click the “Submit for Review” button at the top of the App Details page.

NOTE: Applications must be rated accordingly for the highest level of content that the user is able to access in the app.


簡單說就是 App 裡面的抽獎、贈獎活動包含了賭博的成分,必須在年齡分級裡勾選 "賭博和競賽" 。

另外可能也需要增加與 Apple 無關之聲明,請參考此文章

Official rules for sweepstakes and contests must be presented in the App and make it clear

20.2 - Official rules for sweepstakes and contests must be presented in the App and make it clear that Apple is not a sponsor or involved in the activity in any manner

20.2 Details

Your app includes a contest but it does not:

- Indicate that Apple is not involved in any way with the contest.

Next Steps

It is necessary to:

- Include official rules of the contest or sweepstakes in the app
- Include an explicit statement in the contest or sweepstakes rules specifying that Apple is not a sponsor
- Ensure that the contest or sweepstake prizes are not Apple products


App 裡必須要有參加辦法,並聲明 Apple 不是該比賽、活動、賭博的主辦、協辦廠商與贊助商,且獎品不是 Apple 的產品。

另外可能也要修改年齡分級,請參考此文章

卡在 TestFlight 邀請函無法同意

最近嘗試使用 TestFlight Beta 版測試,其中有個外部測試人員點了信中的邀請連結登入 Apple ID 後仍然顯示以下訊息:

You aren't currently testing any apps. To accept an invitation, you must tap the link in the invitation email.


原因是你"必須"使用 Safari 開啟該連結,最好是用內建的郵件 App 開啟就絕對沒問題。如果是使用 Gmail App 點選它可能是用 Chrome App 打開,千萬別讓費時間在這啊~

Apps must follow the iOS Data Storage Guidelines or they will be rejected

2.23 - Apps must follow the iOS Data Storage Guidelines or they will be rejected

On launch and content download, your app stores 19.1MB, which does not comply with the iOS Data Storage Guidelines.

原因是我把下載的內容放到 <Application_Home>/Documents 底下,而這目錄預設是會備份到 iCloud 以及 iTunes 。依照 Guidelines 來看,Documents 只能放由使用者操作後產生的,而那種能重複下載或產生的要放在 <Application_Home>/Library/Caches ,暫存檔則放在 <Application_Home>/tmp

Cachestmp 不會備份,且 Caches 不是永久的,當裝置容量不夠時會刪除、系統還原時也會清空,如果想要永久就只能放 Documents 。 Library 底下除了 Caches 以外都會備份到 iTunes ,但不會上傳至 iCloud 。

放在 Documents 的檔案也可以手動標示為不要備份,由於我想永久保留至 App 內所以我採用此方法。

- (BOOL)addSkipBackupAttributeToItemAtURL:(NSURL *)URL

{

    assert([[NSFileManager defaultManager] fileExistsAtPath: [URL path]]);

    const char* filePath = [[URL path] fileSystemRepresentation];

    const char* attrName = "com.apple.MobileBackup";

    u_int8_t attrValue = 1;

    int result = setxattr(filePath, attrName, &attrValue, sizeof(attrValue), 0, 0);

    return result == 0;

}

請照以下步驟檢查 Documents 是否肥大
Install and launch your app
Go to Settings > iCloud > Storage > Manage Storage
Select your device
If necessary, tap "Show all apps"
Check your app's storage

參考連結
iOS Data Storage Guidelines
How do I prevent files from being backed up to iCloud and iTunes?
File System Programming Guide